Welcome back!
Let’s talk about product packaging! Packaging is something that may sound super simple but actually carries many different challenges, rules and knowledge that you, as an Amazon seller, should be aware of if you want to create outstanding packaging for your best-selling Amazon product!
However, before we dive into the technical aspects, you might be wondering why custom packaging is so important? Is it important at all? Can’t we just go with plain, brown boxes that suppliers offer by default? Can’t we just skip using packaging at all?
You can, of course, do that. Many sellers don’t pay attention to this; they don’t think it’s important or they don’t want to invest any extra money on top of their product cost and everything else. But, if you ask me, that is a BIG MISTAKE!
I am personally a HUGE fan of custom packaging, and I always, always put extra work into creating the most attractive packaging for the product in a niche I’m working in—as well as making sure it’s practical, of course!
And it’s actually NOT that difficult to do because you will be outsourcing most of the work to a professional anyway. There are no good excuses to avoid doing this, so let’s take a closer look at WHY Amazon sellers with custom product packaging have a much HIGHER chance of winning that sale over someone who hasn’t put in any effort.
Why Does Custom Packaging Matter?
There are many important reasons why you SHOULD DO custom packaging for your product, including (but not limited to):
1) Visual Presence
I’m sure you’re already aware that people who shop online buy with their eyes. Logically, until we have more advanced virtual reality technologies, people shop online primarily by looking at images. They search for a product on Amazon, VISUALLY pick the one that looks the best (in their perception) from the search, click on that listing, and then possibly make the purchase. It’s all a visual experience, and it’s mostly based on product images.

Yes, of course there are other influential factors like price, reviews and a compelling product description, but if we assume that all those things are similar or equal, it is the images that are the main factor influencing the purchase decision.
By default, your product images on Amazon should look nothing but AMAZING! But you already knew that, right? They can look even better if you include packaging image/design into your product images. It will simply look like a higher-quality and more attractive product.
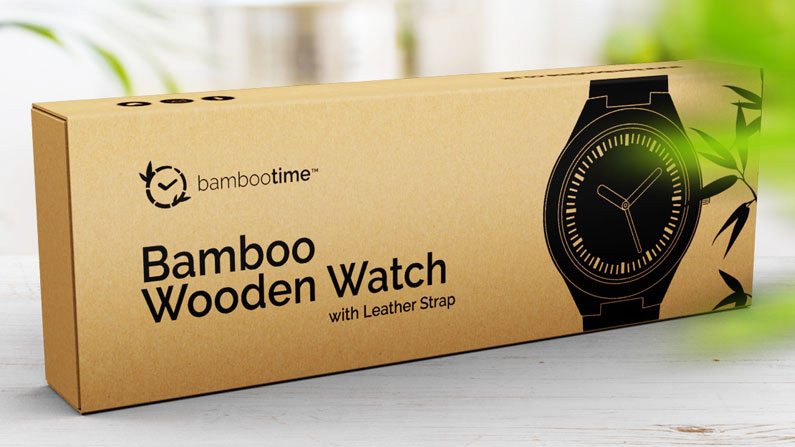
Take a look at these two examples. One product is shown with packaging while the other is shown without:
The product itself is almost identical, but you can see that the shot with the packaging completely changes your perception of the product. It makes the whole offer look much better, more presentable, which I’m 100% sure will be reflected in the conversion rates too, especially as this is a perfect GIFT item and people want to see GIFT items in nice packaging.
So, advantage number one of having custom packaging is that your product images—which are your main selling point on Amazon—will definitely LOOK BETTER!
2) Uniqueness
Customised product packaging will allow you to create a UNIQUE offer on Amazon and stand out from the competition—period! In fact, sometimes all you need to do is come up with a good packaging idea to win over customers WITHOUT even touching the product itself.
There will be competition in almost any niche on Amazon, and the situation will only get more difficult in the future. This means that there are usually another 10, 20 or 100 sellers offering the exact same or similar product as you. You should, of course, try to change or upgrade the product to make yours unique. You should improve it and fix any known issues with it, as I teach in my Amazon Sharks course, but sometimes it’s just not possible. In fact, sometimes customising the packaging is actually an even MORE effective solution, especially when it adds extra practicality, which we will cover next.
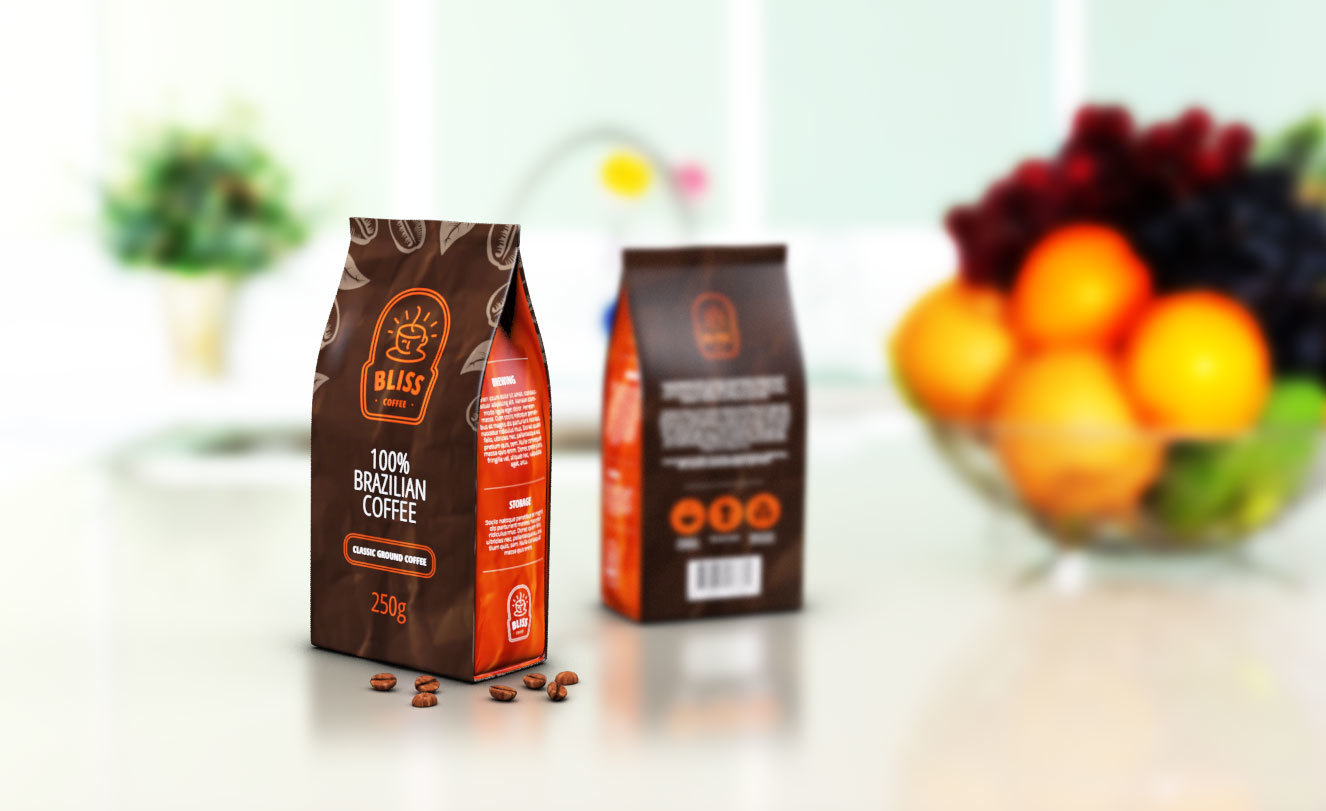
Take a look at this example of two coffee products:

In a category like this, coffee, the product in both packages is essentially the same. Of course, there are low-quality coffees, high-quality coffees, various blends and origins, etc., but you can’t effectively sell those attributes without relying on visual cues. It all comes down to BRANDING and PACKAGING. That’s what people buy. Obviously, reviews are also super important, but when you are just starting out, you won’t have that many of them, so you HAVE to utilise branding and packaging to the best of your ability.
While most sellers in this niche sell coffee in a pouch, Oak & Bond Coffee Co. uses an interesting tube-style packaging, which instantly separates them from others. They still use a pouch inside the tube, but I think the overall packaging idea here is excellent, especially as this is bourbon barrel-aged coffee (as you know, whiskey bottles are also often sold in such cardboard tubes), so it adds an extra layer of authenticity to the product as well.
3) Practicality
This one is HUGE! If you can find a way to add extra practicality to the product through your packaging design, you will instantly increase your conversion rates, stand out from your competitors and win customer love. You’ll be in a position to charge higher prices and still get better reviews as a result!
All you have to do is find a way to make the packaging work for the product. Usually, this means:
- Using it for storing the item while not in use
- Using it as a stand/pad
- Using it to protect the item
- Using it to separate bits and pieces
- Using it to help with using the item
- And so on!
In real life, it means that the packaging will be a:
- Sleeve
- Bag
- Pouch
- Special box
- Etc.
It all comes down to the product in question as each and every situation will be different.
For better visualisation of this process, let’s take a look at a few examples:

These are coils for vaping devices. The product itself is tiny, so a special box—like in the product offer to the left with its special compartments for coil size/type—is a HUGE selling point. This wins over the plain offer on the right with just the coils alone—no question!

Stainless steel tweezers are another great example of how packaging becomes a PART of the product. I think the choice here is very simple. With all other things being similar, you would pick the offer with the pouch included, which gives you a separate placing for each unit to keep them handy and safe. This packaging also helps the seller with shipping the item, keeping it protected from warehouse procedures.
Not all products can be packaged like this, so don’t over-do it. There’s no point in creating a specialised packaging, from a practicality standpoint, for products that are always taken out of the packaging and used in a different environment. These would be situations when the packaging is almost always thrown away right after unpacking, like bedding sheets:

You will still use some kind of packaging to showcase your brand, (most likely a plastic covering or bag with a printed insert), but there’s no point in coming up with a STORAGE type of packaging idea for a bedding sheet when you know that the product will be used on a… hmmm, BED!

With that being said, you should try to think outside the box and work on ideas, even if the product seems utterly boring and you think it can’t benefit in any way from special packaging.
For example, BULBS! Who needs special packaging for a product like this, right? You throw away the packaging the minute you receive your order and take the item out!
But, maybe not?
What if many of your competitor’s reviews show that the product arrives damaged? Shouldn’t you use this information to create some custom packaging with foam padding inside and advertise that you have the SAFEST packaging on the market? You’ll have a huge advantage over your competition if you can guarantee that your bulbs will always arrive in perfect condition.
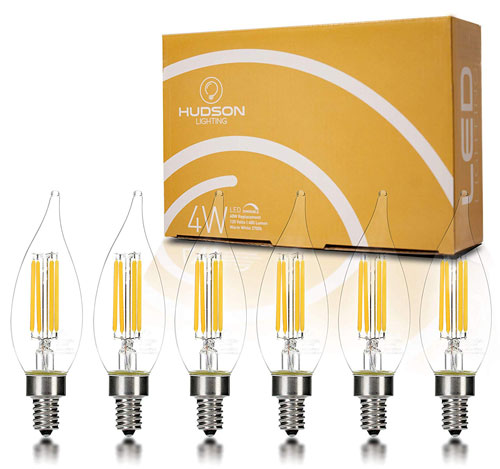
What if you sell a kit or set of light bulbs? People usually just use a few at a time and store the others for later use, right? Wouldn’t it be great to have a box that people can use for that specific purpose?
Exactly! Always, always investigate what customers are talking about in the reviews and use that information to try to come up with a unique packaging solution that also solves a practical problem. This will be the BEST time and money spent on your product!
4) Visibility in Search Results
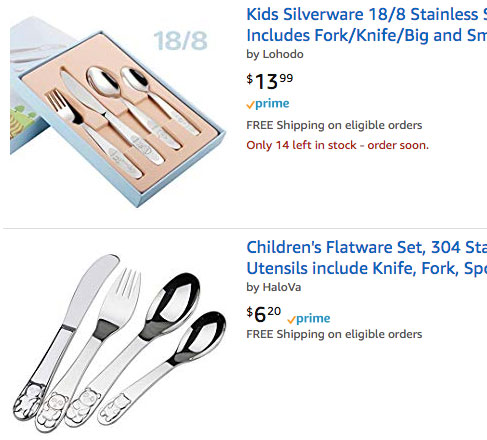
This is another super important advantage of having a unique packaging solution for your product. If you can use the packaging shot in the main product image that shows up in search results, you WILL get a higher click-through rate—guaranteed!
Take a look at this example:

You can instantly see that the listing with the packaging stands out; you’re almost forced to click on it because it’s the only listing your eyes are drawn to. This is SUPER powerful!
Of course, you will often be competing with sellers who also have custom packaging created, and it’s not like you will be the only one who does this. What you can do, though, is make sure your packaging looks different (shape-wise). If that’s not possible, you can use totally different colours for your packaging and branding, which will also help you stand out in the search results because of the eye-catching colour scheme you’ve chosen.
5) Increased Value
This goes without saying really. If you have a custom-made packaging, especially if it also adds extra PRACTICAL value to the product, you can charge higher prices than your competitors and get away with it.
Even if your packaging does not add any extra practicality, it’s still a way to DIFFERENTIATE your brand from others. It’s also a prime opportunity to position yourself as a PREMIUM brand (if the quality is there) and still charge higher prices than others.
People often ask me, “but if I do this, won’t I lose all those customers who are looking for a lower price?” Yes, you will. And in the same way, when you position yourself with BUDGET branding/packaging and the lowest market prices, you also lose those people who are looking for premium or high-end versions of the product. Either way, you attract some and lose some.
I won’t go into all the details of this phenomenon here, but what you need to understand is that there are VARIOUS groups of people shopping for any given product. You simply CAN’T please them all at the same time—and you don’t have to!
For example, when someone shops for a new sports water bottle, there will be people who absolutely will not spend more than £2 on such a bottle. Simultaneously, there will be people who are happy to spend up to £10 or more on such a bottle IF you present the product in an appealing way.
So, don’t be afraid to aim for that higher-end customer. Use more expensive packaging and charge higher prices than others in your niche to attract the customers you want shopping with you. Most of my businesses are based on this concept, and I’m doing very well.
6) Professional Image
This is just another conversion booster. Custom packaging will make your company/brand look more professional, and it will increase your conversion rates.
Take a look at this example:

Both sellers offer basically the same product, but you INSTANTLY feel more secure buying the item that comes in packaging. This is especially true in this case because dental floss picks are a hygiene product, and the packaged version seems safer and cleaner than getting loose items.
At the same time, you don’t even notice that the packaged version has a higher price AND contains less product! You still prefer it over the other listing because it feels safer.
This is an extreme example because it is a hygiene product, but the psychological aspects behind this still work for almost any product. When we see nicely branded packaging, we instantly assume that product is a higher-quality, more professional version of the product.
7) Increased Branding Exposure
Finally, the BRANDING part! This list is not ranked in order of importance, so it’s actually not the seventh-most-important thing; in fact, it’s probably one of the TOP THREE advantages of having customised product packaging! If you have product packaging, you can feature your brand/logo through the listing so that people who don’t even check your description will instantly know who you are, what your brand values are, and so on.

It’s also the quickest way to stand out from competition, right? This is your own, BRANDED product compared to the many unbranded versions or even other brands listed on Amazon. Listing unbranded products with no packaging and hoping for good results is a recipe for disaster. Put a little effort into your packaging at the start and you will have a much better experience selling on Amazon.
Ok, so we’ve just covered seven reasons why you should use custom-designed product packaging. There are a few others, but the point to take away here is that custom packaging WILL make you more money—end of story. Yes, it will cost you more to create such packaging, but as you will soon find out, this extra cost will be minimal compared to other costs. PLUS, the end result is even higher margins and higher NET product on each sale due to improved conversion rates and higher prices. You’re setting yourself up to win when you invest in your branding and packaging.
Now, with theory aside, let’s get into the technicalities of the subject because you really need to know a thing or two about packaging materials, managing a design workflow and manufacturing workflow to create the ULTIMATE custom packaging for your Amazon product!
What Type of Custom Packaging?
This is a huge question on its own, and it would take me hours to cover all the possible scenarios, product types and packaging options. I know I sound like a broken record, but you will simply need to think outside the box and look for creative ways to package your product.
Sometimes it can feel like what everyone else is doing is the ONLY way of doing things, but it’s far from the truth! If we take a look at the previously mentioned whiskey-barrel-infused coffee, almost everyone else in that market is selling their coffee in pouches. That one company has taken it upon themselves to create whiskey-inspired cardboard tubes to store pouches in, which instantly makes their product look unique.
Here’s another example of switching out the traditional form of packaging in favour of tubes:

While most companies in the vaping industry use blister packaging for coils and then pack them in small boxes, some companies use plastic tubes. Not only do these look like a more premium product, but the plastic tube itself is also a great solution for coil storage because vapers need to carry around coils with them and the tube serves that purpose perfectly.
Here’s another example:

Usually, nuts are sold in plastic bags, or sometimes in re-sealable pouches. But anyone who is as big of a nuts fan as I am will know that when you buy large quantities of nuts—like 500g, 1kg or more—it’s super important to keep them in air-tight containers so they don’t spoil (rancid nuts are the worst thing you can eat!).
So, selling a 1kg nut pack in an actual jar makes perfect sense! Although this one looks like it’s a plastic jar (which I’m not a huge fan of), it’s still better than packaging them in a bag. And if you go with a premium brand and quality, a glass jar would make it an even better match! I mean, we buy cheap tomato sauce in glass jars, and this product sells for £30!!! I’m sure there’s room in their profit margin for that glass jar.
Let me ask you this: what is COMMON among all the good examples I have mentioned so far in this post?
It’s actually super simple. These are companies that have listened to their customers. They have taken the time to read and learn from customer reviews. They have adapted their packaging so that it fixes some of the usual problems associated with the product, simply made it more practical or at least more UNIQUE!
I encourage you to do the same. Read as many reviews for your product as you can find. Then take the best ideas from them and create your unique packaging idea based on what people want. It’s so simple when you think about it, yet hardly anyone is doing this.
The simplest and cheapest option is, of course, to simply use the same packaging type that everyone else is already using but customise the design for it. This is not the best option, but it’s still so much better than doing nothing or not using packaging at all.
The most common packaging type will be a cardboard box. If the product you’re sourcing comes in a cardboard box AND you can’t find a more creative way to pack it, just go with the box and simply do a custom design for it. By doing this, you will still gain most of the advantages of custom packaging that I covered in the previous section. The only drawback with this strategy is that your offer won’t be that unique and you probably won’t add any extra value in terms of practicality. As I said, sometimes it’s simply not possible or there’s just no need to use any other type of packaging, so do the best you can with the box design, which we’ll cover in a minute.
As for other types of packaging materials and methods, here are few ideas to get you going:
- Plastic bag – different types
- Resealable pouches (great for food items)
- Plastic tubes
- Plastic jars
- Plastic boxes
- Fabric bag or pouch
- Metal tins
- Glass jar or bottle
- Bottles (not only for drinks!)
- And so on!
What I personally like to do is browse on Amazon (for hours) looking at various product categories, bestseller lists, related products, etc. I just look at what catches my attention as I browse as those are often the most interesting packaging ideas.
An interesting trend that is really hot right now is to use food-grade packaging for non-food items. Let’s take resealable pouches, for example, which are normally used for food items. They can also be used for all kinds of products, like craft supplies:

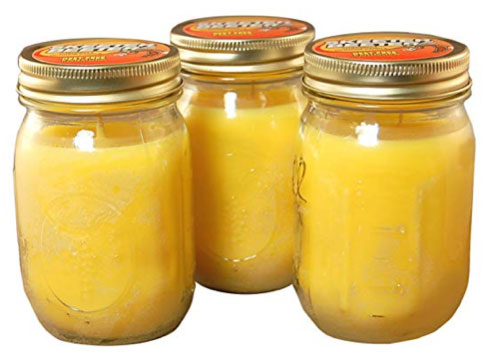
Another popular example is candles in mason jars:
If we go back to the resealable pouches example, they’re widely used in the sports supplements industry for packing protein, pre-workout and post-workout powders, and even vitamins and fish oil. I mention this example specifically because it’s actually one that has the clearest dissatisfaction rate from customers. Here’s what I mean by that:
Years ago, everyone in the sports supplements industry used large plastic tubs for their products, like this one:

These looked great in physical stores and were very practical too because you have a nice tub with a wide, sealable lid.
Then, with the rise of online supplement companies, many brands switched over to resealable bags because:
- They’re cheaper to produce
- They take up less space in a warehouse
- They’re cheaper to ship to customers

However, there is a big problem. It turns out that these resealable pouches are NOT practical at all! Anyone who has tried using them will know this. Some of these bags can’t be sealed properly at all, especially when the product gets ingrained in the seals after some use. Since these are large bags that need to be opened and closed on a daily basis, a large percentage of customers have discovered this flaw and are simply not happy with them.
How do I know? Because:
- I’m personally using these products
- I have read thousands of product reviews in this industry
Even the best, most vouched-for products in this industry with glowing reviews, when packed in pouches, will frequently get some slightly negative reviews that state that while the product itself is great, the packaging is horrible.
What does it mean? Nothing really, I just wanted to share my observations on how product packaging can change the way your customers feel about your product. In the sports supplements industry, cheap brands like My Protein, Bulk Powders and similar will probably continue using these pouches because their margins are so slim that they can’t afford to use large tubs.
On the other hand, premium brands have mostly switched back (or never used pouches in the first place) to plastic tubs. Their customers (including me) are very thankful for that and are happy to pay a premium price for the privilege:

So, your task as an Amazon FBA business owner is to do proper, thorough market research when you are researching new products. Really spend time reading reviews, finding out what kind of packaging could benefit you, and thinking of ways to offer extra practicality that will allow you to stand out from the competition. Once you have done this, the next part of the process is to create the actual DESIGN for your custom packaging.
How to DESIGN custom packaging
for your
Amazon product on a BUDGET!
This section will be very short. There are only two rules you need to follow:
1) If you’re not a professional designer by trade, DON’T even think about doing the design work by yourself. Trust me—you don’t want to do it! The outcome will be horrendous, and you would be much better off just using a plain brown box instead.
2) Find a good packaging designer and outsource design work.
So, in reality, there’s just one rule to follow: OUTSOURCE!
I won’t even get into the details of why outsourcing is your best choice because, just so you know, the level of competition and QUALITY of listings/products on Amazon is AMAZING these days!!!
You’re up against companies who can spend thousands of pounds on design, so don’t even think for a second that you can be cheap with your design—it simply won’t work. Getting a professionally made, pro-grade design is STANDARD in such a competitive market! You’ll never compete with (or out-compete) your rivals with anything less.
Don’t worry; it is NOT as expensive as it sounds. In fact, you can hire a professional designer to do your packaging for as little as £100! In fact, you can get it done even cheaper, but the quality of your design will probably suffer as a result.
So, where do you look for packaging designers?
The first thing to keep in mind is that not all designers and design services are equal. There are various types of designers, like:
- Logo designers
- Web designers
- Software UI designers
- 3D designers
- Etc.
Packaging is a specific design category, so not all designers will do it. And among those who will, even fewer designers will do a good job for you. My advice is to look for designers who have extensive experience and large portfolio of packaging designs, so you can see exactly what kind of quality to expect.
I will give you three simple ways to find such designers:
1) Upwork.com. Yes, same old. The world’s largest freelancer marketplace where you will find thousands of designers, many of whom specialise in packaging design. Expect to pay at least $50 to $100 for entry-level designers and up to $1000 and more for seasoned pro services.
2) JungleMarket.com. This is a brand-new freelancer marketplace dedicated to Amazon sellers and Amazon services. There you will find individually vetted designers who can do packaging design for your Amazon product. Prices start at around $100 and go up to $500 and more.
3) Use the services of my own in-house designer, Jay. Yes, for a limited time only, we’re actually opening up the design service that was previously offered only to Amazon Sharks customers:
https://www.amazonsharks.com/custom-design-service

Packaging design costs just £100, and there are also other design packages available for the logo and 3D product images. Please note that this service can be temporarily closed at any given time and/or price increased IF the demand is exceeding what Jay can do.
If you’re going to use Upwork.com or JungleMarket.com, make sure the designer you hire has a good portfolio of packaging designs. I often see logo designers and even web designers who advertise packaging design services when, in reality, they simply can’t do it! You will learn later on in this post that packaging design is actually created in a totally different format (vector file format, usually using Adobe Illustrator), so web designers or logo designers are often simply not skilled enough in that particular area to even get the technical side of the project done properly.
I’m not saying that you have to use my advertised service or that’s the only viable option, BUT take the time to compare the price and quality of what Jay can provide. For just £100, you will get AMAZING packaging design from a seasoned, tried-and-tested designer. I’m sure you will agree that this is one of the best deals around.
I will also showcase some examples of Jay’s work throughout the remaining sections of this article, just so you know what kind of quality to look for and how exactly the technical side of packaging design works.
When you have found a designer, you will need to give them information on what you want to see on the packaging.
IMPORTANT Information & Elements to INCLUDE
in Your Custom Packaging Design!
Packaging design is obviously important, so, ideally, you should have an idea of what you want to showcase before contacting a designer. But design creation is usually a process where you let the designer’s creative juices flow. If you work with a good designer, you won’t have to teach him/her how to do the job; a good designer will intuitively create a matching design based around your logo, product, overall branding and the type of packaging you use.
However, if you work with a designer who has never done any packaging designs or has never done any packaging designs specifically for Amazon products, you may need to mention that there are certain elements you absolutely MUST include in the packaging design, like:
1) Logo. Obviously, you want to have your logo featured on the packaging of your product. If it’s a box, put it on all sides. Make sure you send your logo in VECTOR format to the designer so he/she can modify or resize it as needed.
2) Name of the product. This may sound like the most obvious thing, but I have seen many products and packaging on Amazon that do not include the name of the product itself! Often, sellers just put a large logo on the box and call it done! But buyers primarily buy your product—NOT the logo! Make sure you have the product name in BIG, BOLD text on the front of your packaging. If you sell Macadamia nuts, say it! If you sell watercolour brush pens, say it loud and clear on the packaging! Ideally, people should be able to read the product name even from the main image of the search results.

Another quick tip: If you sell a pack, bundle or set of more than one product, make sure the NUMBER is big as it can be! If it’s a set of 2 pairs of socks, make that number 2 large enough that it definitely stands out in the search. This way, buyers will instantly see that your pack/set/bundle is bigger or different than the other listings selling just one item. The same applies for bigger numbers, like a set of 24 brushes. Make the number big enough that it can be seen at a glance from the search results! It’s natural that our eyes are drawn to numbers—they stand out among other information in the search results—so this will help you achieve higher click-through rates (from search to your listing).
3) Features. Usually, you will want to showcase some of the most important features of the product too. How much detail you go into here depends on the packaging type and size of the printing area. With boxes, labels and similar, you will usually have enough space to mention three to five of the most important features on the front. Don’t overdo this, though! While three to five features is perfect, ten is definitely too many. Don’t make it look like a long list—no one will read it! If you have space on the BACK of the packaging, you can go into more detail about how the product works there.
4) Barcode – EAN or FNSKU. This is a MUST-HAVE for any Amazon FBA seller! You absolutely need to include the EAN or FNSKU barcode on the packaging design. You can, of course, label products with barcodes afterwards, but what’s the point in doing that? Ideally, you should incorporate this directly into the packaging design to save time and money.

Amazon provides some definite rules on the minimum size you can use for barcodes, so if your product/packaging is very small, this may not be possible. However, I still recommend you at least try it! By that, I mean print out your packaging design/label in real-size format and use a smartphone barcode scanner app to test whether the barcode scans easily or not. If it scans easily and quickly ten times in a row, I’m 99% certain that Amazon warehouse workers won’t have any problem scanning your code with their professional scanners.
Also, think about the location of the barcode, or to be more precise, about how you pack the goods in the carton boxes. The barcode can be on the side of the product or back, but, ideally, you want to pack your products in such a way that the barcode side is clearly visible when the Amazon worker opens your box. By doing this, you will avoid any confusion and probably reduce the chances of an Amazon warehouse worker complaining about the size of your barcode.
As for EAN or FNSKU options: for new Amazon sellers, I simply recommend using FNSKU barcodes on the packaging to keep things simple. But you should know that you can also use EAN barcodes too. Yes, the same barcodes you get from GS1 and use when creating your listing on Amazon.
If you want to use EAN barcodes instead of FNSKU, you will need to use the Commingled Inventory option, which means that your items will be stored together with other seller’s items—sellers who sell the exact same item. Without going into too much detail here, for newbies, it’s easier to stick with the FNSKU label option, but I will cover the Commingled Inventory option in a separate blog post.
5) Quantity, Size or Weight. Depending on the product, you will want to either FEATURE the quantity, size or weight (like in the case of 2 pairs of socks or, say, 24 watercolour brush pens), or you will want to put it in small print somewhere on the packaging, just so it is there (in case your product is actually smaller, lighter or otherwise “less” than what your competitors offer).

With many products, weight is an important thing that customers are looking for (food items, supplements, DIY supplies, etc.), so if your strong selling point is that your pack/product is bigger, make sure you feature that on the front of the design in large, BOLD text! For example, you know that all the other fish oil capsule supplement companies sell packs of 100 capsules, but your product is 300 capsules. In a situation like this, you would want to make that number 300 as big and clear as possible. Basically, you need to build your packaging design around it so that it’s INSTANTLY clear that your offer is better due to its bigger size.
6) Made in China (or another country). If your goods are manufactured in China, you will put a Made in China text on the packaging. If it’s another country, use that. If it’s made in the European Union, you can simply use Made in the EU. If you sell food items, like nuts, you will state the origin of the product as well as the place of packaging.
7) CE mark. If your product requires CE certification, make sure you include the CE mark/logo on design too. If you forget to do this, many suppliers will also offer you those small gold/silver CE labels that you can attach to the top of the packaging.
8) Warning pictograms. This will come down to your individual product, but if it needs any warning messages, make sure to include them. The most common ones will be choking hazard, fire hazard, children’s age limits, chemical/toxic warnings, risk of suffocation, do not take if pregnant, and similar. If you’re not sure which warning messages you need to put on the packaging, you can try contacting the Trading Standards office to ask them.
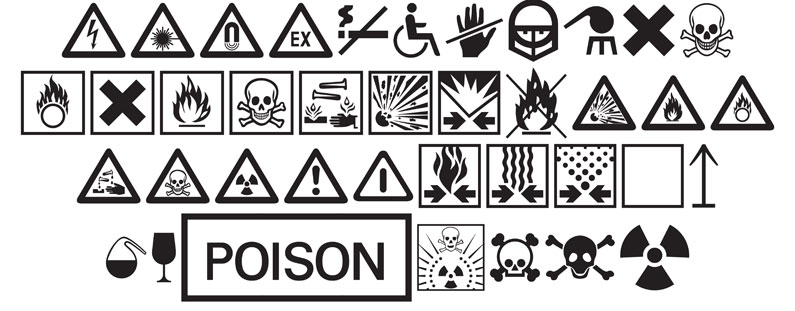
Alternatively, if possible, buy the same or a similar item from a well-known brand or large corporation and simply copy what they have done there (as long as your product complies, of course). Your suppliers should also be able to help you with this based on their other clients, but make sure they’re talking about clients from Europe as there are totally different rules in the US.
9) Recycling information. Ideally, you also want to add recycling information on the packaging, especially if the product you sell is hazardous (contains batteries), or the opposite, if it’s highly recyclable and you want to emphasise that.
10) Website address. Amazon rules technically don’t allow you to advertise your website address in your product images, but there are many companies that do this, including large ones, and it seems like they’re getting away with it. Some are blatantly advertising the website all over the place, like BuyWholeFoodsOnline.co.uk.

Personally, I’m taking a more reserved approach with this because I don’t want to take any risks that might lead Amazon to ban my accounts. What I do is put the website address on the back of the packaging design, sometimes on the sides, and I don’t showcase that side or part of the packaging on Amazon in the product images. So, while I do include my website address on the packaging, I don’t show it in the product images. I think this is the safest and most reasonable way of doing this.

11) Contact Details. Usually, you will want to include some sort of contact information in the form of an email address or telephone number. If you’re importing products from China and act as an importer, then you’re required by law to put contact details on the packaging, such as your company name, email address and phone number.
12) Best Before Date. If you sell food items, chemicals or anything else with an expiry date, make sure you have this information in a visible place.
13) Ingredients. Again, this will mostly apply to food items, cosmetics, chemicals and similar.
So, this is the checklist that most of you should follow as you get your packaging design ready. I know I’m going to get emails like, “but none of my competitors are doing this. They don’t include even half of the list on their packaging!”
Yes, that is correct, especially on Amazon and eBay where most private-label sellers are small companies or just one-man-band types of companies. And there is no institution that can effectively police this. As you can imagine, there are millions of products listed on Amazon, so the Trading Standards don’t have the resources to monitor packaging design requirements. They have more important things to do (like chasing hoverboards?).
With that said, I would still recommend you do your best to try incorporate as much of this information as possible. I have heard about cases where Customs have stopped a shipment because the packaging was missing a warning label/icon. So, it can happen, even though the chances are low.
Besides the mandatory elements, if you have more space to use (like on the back and sides of a large cardboard box), you can include some extra information. You need to fill up the space anyway, right?

Description. This would be a more detailed description than the three to five features/benefits you included on the front. If you have space on the back of the box or on the back label, put a more detailed description of how the product works, or maybe share a tip, recipe, or alternative ideas for using the product.
Short About Us. If you’re building a family-based business or a brand that relies on your personality (if you use your family or images of the founder in your marketing), you can also do this once again on the back of the packaging. Even one sentence along with your family/your picture can change the whole look of the product and make it more personal. It’s not unusual to do this, even on the front of the packaging, so if your STORY is a huge part of your BRAND, make sure to utilise it here.
Assembly instructions. This is pretty self-explanatory. If the product requires a quick assembly, you can put these instructions on the packaging design. But this will only work for very short instructions because space is usually limited. With more detailed, step-by-step guides, I still recommend you create a separate, printed instruction manual to include with the product.
Safety instructions. While you may be required by law to include warning pictograms on the packaging, if your customer can benefit from more detailed safety warnings and/or instructions, you will want to include those too, right? Even if it’s not a question of huge risks, you may still want to warn your customer about a specific way the product works best or specific way the product needs to be handled or installed.
Social media profiles. I put this in the optional list, but it probably should go in the mandatory list by default. Have those Facebook, Instagram, YouTube icons along with your usernames or full links included! It will make your packaging look more modern and dynamic, and, of course, people will be able to find you and connect with you online if they want to.

Endorsements. If you are working in an industry where endorsements are a huge part of branding and advertising (like Sports), make sure to use this. This will obviously only work if you have an endorsement deal in place with someone famous (or not so famous), but don’t forget to showcase it on the packaging design too if you are in a position to do so.
Related product advertisement. Many companies use packaging as a place to advertise other products. This is very popular in the kids’ toys niche (think Lego) as well as many other categories (crafts being another popular one). So, if you sell several, HIGHLY related products, you can include a small advert on the back of the packaging. Maybe you can even include a small discount/coupon code for it as an added incentive.
Ok, these are the main points that come to mind when we talk about the important information that you SHOULD include on your packaging design. But what about the DON’TS? Are there any?
Yes, there are few things you should never put on a packaging design:
1) Misleading information. Any kind of promises, marketing messages or similar should be eliminated completely. It just won’t look good. Plus, chances are you will change your marketing message and text many times over, but the packaging will stay the same. Base your packaging design purely around FACTS.
2) Any competitor information. Even if you do use a competitor comparison strategy for your Amazon listing, I don’t think it’s a wise idea to include it in your packaging. Firstly, that information may change frequently and, secondly, it simply doesn’t look very professional. Remember, the person has already bought the item from you. You don’t have to convince them when they see the back label or side of your product box.
3) Price. NEVER put a price on the packaging design! For a start, Amazon prohibits it. But most importantly, there’s a very high chance that you will change your product’s price frequently, but you won’t be able to change the packaging every time.
Ok, that’s about it! I have tried to cover the most important elements and information you need to include on your Amazon private label FBA product as well as the information you absolutely SHOULDN’T include! If I have forgotten something important, please leave a comment below this post.
Now, you may think that everything is super clear and you’re ready to go, right? Not so fast….
Before you can put this knowledge into action, you need to understand some VERY IMPORTANT technical rules about how packaging design is created, as well as how actual packaging materials are printed and manufactured. Let’s get into it!
Technical RULES that can
Make or BREAK
your packaging design!
If you’re working with a good, experienced designer—like Jay, for example—they will already know all of these rules. However, as a business owner, you should still familiarise yourself with at least the basic technical information that is important when designing custom packaging for your Amazon product.
The first thing you need to understand is that not ALL packaging materials are printed in the same way, and not all materials will be suitable for all designs.
For example, if it’s a glass jar with a 10 x 15 cm label on it, it will most likely be printed in full colour (what is usually referred to as CMYK printing). You won’t have any limitations on design or colours because such labels are printed at a really high quality and can provide the same high-quality print results you would see in a magazine:

On the other hand, if the packaging you use for your product is a brown cardboard box (that “eco” type that is very popular right now), you won’t be able to use CMYK printing as it simply won’t look good! Cardboard just can’t be printed on at a super high quality in single colours, never mind full-colour images. If you do use such packaging, make sure to use only one colour (black) or a maximum of two or three colours (black + some other spot colours like red or green or white, if that’s an option):


Alternatively, when using packaging with limited print options, you can use a label over it, but the end result won’t be as professional, and I don’t usually recommend this strategy. I would rather use just a few colours and get the box printed than use a label over the box (which looks a little cheap, in my opinion).
Of course, there are smaller boxes that are made in card-stock type material and can be printed in CMYK and will look great! Often, such boxes (in the cosmetics industry, for example) are printed and then FOILED to apply a gold or metallic effect on some parts of the packaging, like on the product name or logo.

There are hundreds of examples I could talk about here, but as this post is already getting too long, I just want you to be aware that not all packaging materials will be suitable for full-colour printing and that you need to pick the BEST option within your limits.
Always ask your supplier, if possible, to send you a sample of the packaging when you order product samples from them (or even after that, once you have selected the final supplier to work with). It doesn’t matter if the packaging has other brand details on it or even if it’s blank. It will allow you to at least see and feel the packaging in real life, so you can make any necessary adjustments to it before it goes into full production.
Just like selecting the packaging type, do thorough RESEARCH on what other companies in your space are doing and try to think outside the box! This could mean, for example, using a different printing technique to stand out. If everyone else is using standard, full-colour printed boxes, maybe you want to use BLACK boxes with a gold hot-foiling technique to showcase your brand name on the packaging.
Another example is the use of white ink for printing, which is now finally possible via various printing methods, and it can look great! White looks amazing on dark backgrounds and even on those eco-style cardboard boxes.

If everyone else uses shiny/gloss printing, maybe you should use matte? If everyone else uses boring brown pouches with small stickers on them, maybe it is worth investing in a custom-designed pouch for your brand? Use colours and your logo to instantly stand out from the competition!
Whatever you do, make sure that the printing technique used on the material allows the use of full-colour design. If it does, make sure it looks good. If you find you’re limited to the use of a few single colours, make the most out of it by creating a design that is unique and eye-catching!
Usually, the biggest decision you need to make is whether or not you CAN do a full-colour design, if you need to stick with a black and white version, or if you can only use a few colours. The designer will need to know this information before the work begins on the actual design.
When you start dealing with suppliers on Alibaba.com for the first time, you will soon find out that most of them outsource product packaging to other companies. It makes sense, right? Printing houses run their equipment 24/7 to make their products as affordable as possible; no manufacturer could do that with in-house printing equipment, which, by the way, on a professional level costs millions of pounds.
And this is good news! It means that, usually, you can ASK for different packaging materials, different packaging types and printing techniques. If you’re dealing with a good supplier and order decent quantities, they will be happy to help you out with this and will find a printing/packaging company that can do it for you.
Lastly, to better communicate with your designer AND your supplier, there are specific terminology and phrases that are often used—terms and words you should learn and familiarise yourself with so you know exactly what they’re talking about:
Raster Design
This is the traditional way of creating a web design or any image for online use. Raster graphics are created from PIXELS, and the image’s size (how big or small it is) is determined at the moment it is created. You can’t exceed/increase its size later on WITHOUT losing quality because each image consists of a set number of PIXELS. Raster files will be your typical images and photographs in .png or .jpeg file format.
Vector Design
When we talk about packaging design, vector file format is the one we use. Unlike raster graphics, vector files are created using PATHS and can be scaled up (increased in size) to whatever size you want WITHOUT any quality loss. In general, vector files also provide higher-quality, crisper print outputs and allow editing of files later on in post-production.

The most common vector file in everyday use is the .PDF format, which is also used in printing. Designers usually work with the Adobe Illustrator program and present final work in .AI and .PDF, print-ready format. For web use, you can also ask for a .JPEG version of the same file.
Bleed
No, it has nothing to do with blood! 🙂 Document bleed is a term used in printing. It means the extra space OUTSIDE of the actual design, which will be trimmed off. The industry standard is 3mm, but sometimes it can be more or less.
In practice, what this means is that you need to create a design file slightly BIGGER than the actual packaging will be. For example, if you need a label that is 100mm x 100mm, the actual design file should be sized 106 mm x 106mm—an extra 3mm on all four sides.

The bleed is needed for a very simple reason. When your packaging design is printed on large sheets, it needs to be cut down to a specific size. This bleed area of 3mm on each side is like a safety net and a way to separate each design on the bigger sheet so it can be cut down.
For this reason, you should NEVER put any important information or text CLOSE to the bleed area because sometimes part of it can be trimmed off. Also, not all cuts will be exactly the same, so if you have important information CLOSE to the bleed area, it may be positioned differently on each package depending on where the cut was made.
Lastly, don’t END any design elements or lines or background colours at the bleed line. You want to continue them beyond the bleed. This way, if the cut is 1mm or 2mm off, you still get the same look and no white lines or blocks appear.
CMYK
I have already mentioned that CMYK basically stands for full-colour printing. In CMYK, the C, M, and Y stand for cyan, magenta and yellow, three colours that can be mixed to make up any other colour (your classic inkjet-printed colours), plus the K, which stands for pure black.

There are now various alternative methods available, like five-colour litho printing where you have CMYK + spot colours (like gold or silver), but in general, in traditional packaging manufacturing, CMYK is what you will be dealing with.
Spot Colour
This means the use of an individual, pre-defined colour. If we go back to the eco-style, brown cardboard boxes, the supplier might tell you that you can use one, two or three spot colours for printing and, usually, each extra colour will cost you extra due to how these printing jobs are set up.
Pantone
Not many people are aware of this, but Pantone is actually a corporation in the US that created and established the Pantone Matching System (PMS). The Pantone Matching System is widely used nowadays in the printing industry, as well as in home decor (all your paint-picking for wall decor), construction, fashion and other sectors.

The Pantone scale and Pantone colours mean that you can select a predefined colour from a chart and the final print output should match that colour exactly—no matter where, how and why you’re using it. There are Pantone colour charts available online; you can buy printed books as well as download apps for your smartphone.
Royalty-Free Images
Often also called Stock Images. There are special websites online where you can BUY the rights to use other people’s images in your product packaging design, marketing and so on. For example, imagine you need a great image of a cat on your packaging design. It will be so much cheaper and easier for you to BUY an image from a professional photographer online rather than trying to take one of a similar quality on your own.
There are many popular stock image services out there, but, in my opinion, you will find the best images on Shutterstock.com. It has a massive library consisting of millions of high-quality images:

And you can also use these stock images for your Amazon product images as part of your lifestyle image scenery. Again, it is much easier and cheaper to buy a stock image and ask someone who is an expert in Photoshop to blend it with your product image to create a realistic scene. You won’t be even able to tell that the image is fake if you use a high-quality designer.

One important thing to remember when buying stock images is that there are different levels of licence available for purchase. For product images, the cheapest option will usually suffice, but if you want to use an image in an actual PRODUCT design or packaging, you will typically need to buy an EXTENDED licence, which can cost an extra $50, $100 and more. It’s still much cheaper than doing it on your own and you get a better quality image, so I don’t think it’s bad value at all. Just make sure you FULLY read the licensing rules on the stock image website to avoid any problems in the future.
Cutter/die guide
This is a file that shows the layout of the box design. If you’re going with a predefined box style and only changing the design on it, ask your supplier to send you this cutter/die guide file so that your designer has a layout to put the design on.
If you’re creating custom packaging or a custom box size/type, you will need to pay someone to create this file and pay the supplier for the actual DIE that will be used to cut your customised box (or customised label design).

Whatever your situation, make sure you have the file on hand when contacting your designer. You can’t simply tell them “I need a box design,” without providing the layout of the box (aka cutter/die guide file). If it’s a simple box, my designer, Jay, can create the layout file for you for a small extra charge.
FNSKU or EAN barcode
Finally, the FNSKU or EAN barcode! Your designer will need this in a vector format (PDF format) to integrate it into the design. Remember, you will only use ONE barcode on your packaging—either FNSKU or EAN, but NEVER both!!!
If you have more than one barcode, Amazon may actually refuse your delivery or ask you to pay to cover up one of the barcodes with an empty sticker.
So, where do you get these files? For the FNSKU barcode, Amazon provides you with the file! The first thing to do is make sure your listing is FBA enabled. If not, convert it to the FBA listing type. The next step is to select the listing. From the menu, choose “Print Item Labels”. Then simply send the auto-generated PDF file to your designer. Don’t worry that there are 21 or more barcodes on the sheet, your designer will be able to take just one and implement on the design.
If you’re using EAN codes, you can either get the barcode directly from the GS1 website OR use any of the free online barcode generators, like https://barcode.tec-it.com/en/EAN13.
They will do the trick and turn your EAN numbers into an actual barcode file, which you then forward to your designer.

Ok, these are the most commonly used terms and principles when it comes to designing a custom product packaging. If I have forgotten something here, please leave your questions below in the comments box. I will personally answer them within 24 hours, Mon.-Fri., if not sooner.
As you can see, I LOVE talking about packaging design and anything to do with this topic because I have lots of experience in working with all kinds of packaging materials, machinery and printing techniques. I also own a manufacturing business that is heavily focused on packaging, so I’m really passionate about this topic and happy to share what I have learned in my 15+ years of doing this.
Before we wrap this up, I want to quickly showcase some of the most popular printing techniques for packaging materials because, again, as a business owner, you should be aware of what’s possible and available out there! Without this base knowledge, you can’t really come up with creative ideas or interesting packaging concepts and designs.
Printing Techniques for Custom Packaging
I have personally tried and tested all of the printing techniques covered here (AND MORE!), so I’m speaking from personal experience, not some theory or abstract college book. With most packaging printing, manufacturers will use either offset printing for large runs or digital print for small runs—like labels, for example. The list I have created here includes many more options for you to consider. Some of them are typically used for printing logos on the actual product, but if you are creative and think outside the box, many of these unique printing methods can also be applied to packaging—especially if you need something small, intricate, luxurious or expensive-looking.
Without further ado, let’s quickly go over some of the most popular printing techniques for custom product packaging!
Offset printing
This is the most commonly used printing method nowadays! Virtually all the books, magazines and newspapers you see today are printed using the offset printing technique. With offset, you can print with individual colours (for example, only print in black), CMYK mode and various additional modes where spot colours are added to CMYK (full-colour + a gold spot colour, for example).

The biggest advantage of using offset printing is the COST! It’s the cheapest printing method out there, and if you’re printing packaging in bulk, every penny counts, right?! Exactly! And unlike product costs, packaging costs can actually be kept under your control by:
- Choosing various packaging types
- Choosing various printing methods
- Choosing various packaging materials
- Choosing the QUANTITY of your order (this can be the difference between a 10p box and 80p box)
In terms of materials, almost anything can be printed with offset, apart from heavy card-stock and corrugated carton material (this is usually used for outer carton boxes). But even with these materials, there is a way for offset printing to be used—printing houses simply print the design on standard paper (any sort, matte or gloss) and then glue it onto the thicker packaging material.
The downside of this printing technique is the QUANTITY you need to print! Offset is very cheap if you print more than 500 or 1000 pages at one time (and pages are usually pretty large, B1 or B2 format). The more you print, the cheaper it gets.
The pricing structure works this way because there are fixed costs associated with setting up any offset job, like creating printing plates and setting the machine up for work. Once the machine is set up, it churns out fully printed pages at a very high speed, and the cost of the actual paper and ink is quite low.
So, if you need to print high quantities of ANYTHING, go with the offset printing. It is the best way to get high-quality prints at the lowest possible cost.
Digital printing
This is the printing method typically used for low runs—a few hundred to a few thousand pieces max. With digital printing, there are severe restrictions on the materials you can use. In particular, it can’t really work with very thick card-stock (which mostly is used for boxes).

However, it can work really well for small runs, like labels, order inserts, packaging inserts and similar printing jobs.
The biggest advantage of digital printing is the LOW quantities! You can even get 100 pieces printed this way and the cost won’t be that much more than with 500 pieces because there are NO fixed set-up costs like you have with offset printing. Digital printers essentially work like normal office printers, just on a much bigger scale! Plus, the output quality will be much higher than your normal office printer.
In terms of quality, the latest digital printers can produce the same quality of final print as the offset technique. With the correct materials, it is capable of creating that matte finish that everyone is looking for OR a high-end glossy finish if needed.
Another advantage of using digital printing is the ability to print in WHITE. Yes, this is currently not possible with offset printing (as far as I’m aware), but digital printers CAN print in white on dark materials, which can look AMAZING for packaging designs.
The downside of digital printing is the cost—it won’t be cheap—but there are really no alternatives for small runs. If you need a small run and go to an offset printer, the cost will be much higher than a digital printer.
Basically, there is a gradation/scale on quantity and price. In the middle, both printing methods cost the same. With increasing quantities, the cost for offset goes down, like this:

Overall, I do like digital printing and have used it a lot, especially when I need just a few thousand small labels done or some type of small, quick run of promotional materials. For box printing, it only works if the material itself is quite thin as the digital printer usually can’t handle anything more than 250 – 300 gm/m2 material weight.
Hot foiling
Hot foiling means that an image is transferred from special materials using heat applied directly onto the packaging material. Often, hot foiling is used together with offset printing or digital printing to create METALLIC design elements on the full-colour printed package.

So, why do we need this when I already said that you could print in gold colour using the offset press? The use of gold colour in offset printing is NOT the same as using gold foil material in hot foiling. Gold colour in offset is just that—a spot colour of gold—but it does not come with metallic shine or the characteristics that create a TRUE gold or silver effect. Nothing beats hot foiling if you need to create that metallic look on your product packaging.
And it’s not only a gold or silver effect that is possible! Nowadays, there are foils available in hundreds of colours and effects, like neon colours and even chameleon effects! You can also use hot foiling to apply pure white colour to any dark background or pre-printed material.

The downside of hot foiling is that there are usually fixed costs associated with it, so you need to create a special foiling die made of magnesium or brass, which, based on size/complexity, can cost anywhere from £20 up to several hundred pounds.
These dies can be used many, many times though, so it’s not like you have to spend that money on a die each time. Magnesium dies can last for tens of thousands of impressions, while brass dies can last for MILLIONS! Brass dies are obviously more expensive than magnesium, and there are some technical limitations too, so you will need to work with the printing company to find out which method works best for you.
When it comes to materials, there are no limitations as hot foiling can be applied to paper, card-stock, and even cardboard, wood or any other material that can handle heat transfer. If the material can’t handle heat well (like a plastic pouch or tube), you can still use hot foiling on labels and apply them to the final packaging.
If your Amazon product packaging needs that metallic finish or special spot colours to make elements stand out on dark backgrounds, hot foiling is the printing method you should investigate.
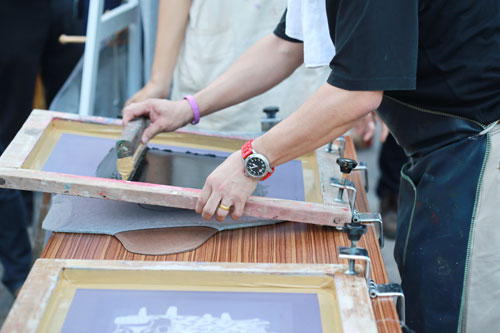
Screen printing
Screen printing is one of the oldest printing methods with hundreds of years of history. It has actually come back in popularity recently. These days, it’s very common for companies to use screen printing to apply designs to various products, like:
- T-shirts & other clothing items
- Greeting cards
- Book covers
- Invitations
- Pillowcases
- Curtains
- Shirts, jackets
- Etc.
Even though there are now digital printing techniques available to achieve the same effect, screen printing is still very popular, especially with design applications to various fabric materials.
But it can also be used to apply a logo or simple graphics to a product packaging! Usually, screen printing will be used when your product packaging is made of that eco-style card or recycled, brown cardstock, but you can also use it to apply designs to corrugated boxes too since there are no limits on material thickness.
Another advantage of using screen printing is that the colours are extremely rich and full because they’re directly transferred to the surface in a very solid layer. This means you won’t see anything through the design, even if the material underneath is pitch black. Again, this is great when you want to print WHITE designs on dark backgrounds.
There are a few downsides, though:
- Design limitations. With screen printing, you won’t be able to use very small or detailed designs—it just won’t work.
- The cost. There’s a fixed cost associated with each design as special stencils are needed for the design transfer. It can get expensive, especially if you use multiple colours.
- Large runs are not practical due to the manual nature of the application process.
With that said, it can still work very well for small runs and simple designs. Another scenario where you can consider using screen printing is if you want to apply your logo to master cartons (outer carton boxes). Basically, if you want to brand your shipping boxes just like Amazon or ASOS does. Screen printing can allow you to do small runs of this type of printing at a relatively low cost.
UV printing
Lastly, the most modern and advanced printing method of all: UV printing. Some experts believe that in the future, UV printing will actually replace offset printing. For now, however, it’s mostly used in prototype work for packaging, signage work, promotional items, mobile phone cases and other applications where small quantities of product are typically printed.

The great advantages of UV printing are that:
- It can print on almost any surface (you lay products flat on a special table and set the printer height accordingly).
- Special colours, varnishes and 3D effect layers can be applied to create truly unique results.
This still a relatively new innovation, so costs are still high. These large flatbed printers cost tens of thousands of pounds, with the most advanced versions costing hundreds of thousands of pounds. The good news, though, is that the actual ink they use in these machines is not that expensive.
Also, while these machines may sound extremely expensive to us, they’re actually good value for the printing houses who run them 24/7, all year round. For example, a brand-new offset printing machine in B1 size costs at least £1M to £2M! Yes, MILLIONS! So, compared to that, these UV machines are quite cheap.
Obviously, UV printing technology is not yet capable of replacing offset printing, but it’s worth taking a look at the kinds of concepts some companies are working on to get a step closer to that goal:
That’s Star Wars for me! 🙂 I can see it is working and I can see how it can and will replace offset printing, at least to some degree. With offset printing, you need to have a MASSIVE workspace because those machines are HUGE! Plus, you need to create new printing plates for each job. PLUS, the offset printing technology is basically a stone-age concept! Nothing major has changed with it since it was invented. I do think that it’s time for a change, time for a 21st-century printing method, and UV printing might be just that.
Most likely, for an Amazon business and Amazon product packaging, you won’t be using UV printed materials. However, if you have an interest in starting your own manufacturing business, an entry-level UV printer could be a superb investment that would allow you to manufacture thousands of different products. I talk more about this in the Manufacturing Paradise bonus module of my Amazon Sharks video course.

And that’s about it! These are the most commonly used printing techniques for producing custom product packaging. There are obviously many more methods for specific situations. These are often used on small production runs to create even more sophisticated or unique looks, like:
- Laser cutting
- Thermal printing
- Engraving
- Stamping
- Embroidery
- 3D printing
- Label printing
- And more!
What a list, right?! There are so many options to choose from! Even simple packaging forms like a box can be completely transformed by these creative printing techniques, allowing you to achieve unbelievable results!
The sky REALLY is the limit when it comes to product packaging, so you, as an Amazon private label product business owner, should have at least a basic understanding of these printing techniques. Only then can you accurately analyse what your competitors are doing and create better and more unique packaging solutions that will make your product stand out.
Ok, for the few of you who have made it this far in this article, let’s sum it all up. There are still a few tips and tricks I want to share with you about creating custom product packaging for your Amazon business. It’s time for a…
Conclusion
If I had to summarise everything I have covered in this article, I would put it in one sentence:
Outsource your Amazon product packaging design to a professional designer!
This will eliminate 99% of the problems and mistakes people make. A seasoned packaging designer will know everything I have covered in this post and more, so he/she will be able to guide you through the process no matter what you say or what your ideas are.
If we use my designer, Jay, as an example, he has created HUNDREDS of packaging designs for clients. He knows all about bleeds, CMYK, Pantone colours, etc., and he offers a great-value packaging design service for just £100, which, in my opinion, is real BARGAIN! You will find it very hard to find someone providing his quality of work for that money.
Another huge advantage of working with Jay is that he will also create a 3D version of your product packaging. This is an image you can use in your product listing to showcase your product with the packaging. Usually, this is an extra service, and not all designers are capable of working with 3D creation programs. Let me tell you, those 3D images look really great!

Still, whatever option you choose—Jay or any other designer—it helps if you know basics of printing techniques and the various packaging types and materials so you can create that final, custom-made, unique packaging for your Amazon private label product. I really hope this guide becomes your ultimate “cheat sheet” for this process, so make sure to bookmark this page, print it out, or share it with others so you have it to hand whenever you need it.
Don’t forget: apart from the selling/marketing advantages, the most important function of ANY packaging is to PROTECT the product!!!
This may sound obvious, but I can remember many occasions when a product was delivered in beautiful packaging, but it was not practical or simply didn’t protect the product during shipping. By not practical, I mean the product was hard to use BECAUSE of the packaging, which is not acceptable. For example, if you put some kind of product that has large pieces into a bottle and it’s very hard for the customer to get the product back out of the bottle, then you’re guaranteed to get upset customers and bad product reviews on your Amazon product page.
Shipping is also important. Luckily, Amazon uses very sturdy outer shipping boxes and cardboard sleeves. But don’t forget that your product will come from China, then be UNLOADED into Amazon’s warehouse, then picked up when the order comes in, then put into a box and then shipped out to your customer. It’s a long journey for any product, so if there’s a chance that product may not survive this journey, something is wrong with your packaging. You either need to increase the material strength or thickness, or just change it completely to be more functional.
I have also seen products that use double packaging, which means that the actual product is packed in a more delicate box, but there’s another, plain cardboard box outside it to protect it. A common example of this would be the packaging of any fragile or glass products. Double packaging obviously increases your costs, so, ideally, you should just make your primary packaging strong enough to withstand shipping and warehouse processes.
Speaking of saving money, many people get so obsessed with their branding from the beginning that they think they need to brand the OUTER carton boxes too. These are the master cartons that your products are shipped to Amazon in. Don’t do it! Don’t waste money on things that are not important! No one apart from a Chinese supplier and an Amazon worker will see your fancy boxes. Unless you start selling into retail stores, I really can’t see any reason why you would want to brand your outer boxes.
There’s another big sub-topic of the whole custom packaging theme: Unboxing Experience.
This is the extra mile you can go if you decide to be a company that takes your product and shopping experience to the next level. And you may actually NEED to do that, especially if you’re working in a very competitive niche, like screen protectors, for example.
Apple is a great example of a company who have embraced the unboxing experience. In fact, they started the global trend around the experience of opening their product packaging. It is so simple and so effective. Nowadays, many companies try to copy what Apple have done, and many of them do it quite successfully.
Personally, I have had great unboxing experiences lately with many products, including ones that have come from China. I already mentioned screen protectors. There’s a company called Anker that I recently purchased from, and I was quite amazed by the quality of the packaging material, the layout of the box, and all the accessories and instructions I received from them, especially considering the price I paid. Now I see that many Chinese screen protector companies have started doing similar packaging.

Another great recent experience I had was buying the NEST thermostat. Great packaging and great instructions. For a product that is highly technical, I was easily able to install it on my own.

I also like Amazon’s own product packaging. I like how simple and earth-friendly it is. This is actually a big global trend right now. Products are increasingly packaged in recycled cardboard with very minimal printing, often just in black, with each item placed in specially designed compartments and smaller boxes. Another massive business that uses this approach is Dollar Shave Club:

Not all products require you to create such highly customised packaging or create a positive unboxing experience for your customers, but if you can do it, I would recommend it. Especially if you’re selling something that carries any design value, is fragile, or products that are made of multiple pieces or require assembly/installation instructions. With most products, you can think of creative and unique ways to stand out from your competitors and impress your customers.
Lastly, while we’re still on the unboxing experience, if your marketing plan involves using YouTube influencers to promote your product, the actual packaging and unboxing experience is vitally important! YouTubers will usually want to do the unboxing process on camera, and if you can make the process easy, interesting and practical at the same time, you will win some love before the actual product is even shown. So, think about whether the unboxing experience could be an advantage in your marketing strategy.
As you can tell from this article, I am a MASSIVE fan of doing custom packaging for my products. I truly believe it plays an important role in my overall success because so many people make purchasing decisions based purely on the visuals they see in the search results and product page.
In my Amazon Sharks course, I talk a lot about differentiation. In almost any niche, there will be dozens of others selling essentially the same item, and everyone is doing their best to sell THE BEST version of the product. Ultimately, the best will be decided by the customers when they receive the product and talk about how good it is in the reviews.
With a great brand and custom packaging, we can demonstrate the value we provide through our Amazon listing and product images. Putting in the effort here instantly creates that added value you’re looking for. It makes your offer look unique, even though the product is almost the same as what everyone else in your niche is selling.
People often ask me, “should I do packaging in China or in the UK?”
If at all possible, do it in China. Work directly with your supplier, who will most likely outsource it to a printing house or packaging factory. There are several reasons for this:
- It will be cheaper to manufacture custom packaging in China;
- It will be easier for you to receive the product already packaged from China, so you can send it directly to Amazon if you want;
- It will be cheaper. Did I already say that?
Chinese suppliers are actually very good with packaging; they can produce high-quality packaging as long as you’re happy to pay for it and can reach certain MOQs. There’s no point in complicating things and doing it in the UK.
The only times I would consider doing it in the UK is when:
1) The product itself can be shipped flat or unassembled from China and it becomes much larger in size when the packaging is added. Still, in this situation, you can order the packaging from your supplier in China so it gets sent along with the product and you can then assemble it in the UK.
2) You need something very specific, super expensive or complex done. You simply can’t afford to do anything like this in China due to the risk of bad-quality packaging. I can’t come up with any examples right now, but I’m sure there have been several occasions where Amazon sellers have regretted taking this risk and lost out as a result.
3) You can’t afford the MOQs your Chinese supplier asks for. In that case, you can sometimes find companies locally that can do smaller runs for you, maybe using a different printing technique altogether.
Speaking of MOQs, this might be a problem for some of you. The classic example is that you order 500 products, but the supplier says that the MOQ for custom boxes is 1000. What should you do?
First of all, try to negotiate it down. If 1000 is possible, they will often come down to 500. Offer to pay a slightly higher price for this first run to get it done. Explain that this is the first order and you have limited funds, you need to test the market, etc.
If that doesn’t work, another solution is to print ALL 1000 boxes, even if you just order 500 units of the product. The way it works is that you will pay for all 1000 boxes, then the supplier will use 500 of them for your first order and simply leave the remaining 500 in reserve for your next order. This is often the best way to get custom-printed packaging for small initial orders. It can work with any number of boxes or packaging, as long as you’re willing to invest a bit more money upfront into packaging materials that will then be ready for your next order at the Chinese supplier’s warehouse.
One last tip: if your supplier offers to shrink wrap your products in plastic (usually for free or very little cost), do it! Shrink-wrapped products will be even more durable during shipping and order processing. Customers also REALLY love the experience of receiving a shrink-wrapped product and taking off the plastic because they know they have received a brand-new product!

It may not be a good idea to use this if your brand value is all about using recycled materials or saving the planet, but apart from that, shrink wrap works well with most products and most packaging types.
IMPORTANT!!! Make sure you ask the supplier to NOT shrink wrap your products before you have carried out the pre-shipment inspection. Only when the inspection is carried out and you have approved the shipment should they shrink wrap the product and put it into master cartons for exporting.
And that’s about it! That’s just a small portion of what I know about custom packaging. But for many of you, it’s a lot of new information, tips and ideas to implement in your Amazon private label product business.
If you would like to learn more from me and how I create products that smash my Amazon competition, consider joining my Amazon Sharks program. I teach people, in video format, how to create a successful Amazon FBA business from scratch.
Alternatively, if you would like to learn more about the packaging industry, I can’t recommend it enough that you to visit a trade show dedicated packaging! The next one I’m planning to go to is Fespa Global Print Expo 2019:
https://www.fespa.com/en/events/2019/fespa-global-print-expo-2019
It’s the quickest and most FUN way to learn about new printing techniques and developments in the packaging world.
Any questions? Feel free to leave them in the comments box below this post. I will personally get back to you within 24 hours, Monday to Friday. Also, don’t forget to connect with me on Facebook to stay updated with the latest news and blog post announcements!


Informative post! This is a great share thank you
Useful post! I really need this type of article.. this is very useful for me.
Hi Andrew
I am really stumped as I want to sell a sports scarf which has my own printed logo on it (non registered trademark).
I really don’t want to have to put it in a clear poly bag as the packaging.
I was thinking of alternatives
– a frosted ziplock bag with logo printed on
-a customised coloured mail bag with logo and art work on
– a cardboard cylinder with customised design and logo.
Would any of these be acceptable as they will all protect the item inside. I could have a barcode printed on the packaging with a description of what’s inside and if needed a suffocation warning (I’m not 100% sure if this is needed if they are not for children).
Your help and any ideas on suitable alternatives to using a poly bag would be appreciated.
Kind Regards
Hi Lindsey,
Thanks for your comment.
Yes, all three options could work. Cardboard cylinder, even though could look very beautiful, will increase the size/thickness of the package, which you don’t want as it will result in much higher FBA fees.
I would probably go with the “soft touch” frosted ziplock bags, they look very cool and will give you that custom look.
Thanks,
Andrew
Hi Andrew, Great information by the way. I have a quick technical question. my packaging has just been designed for a product that I plan to launch very shortly, I actually work in the design industry. The packaging is on plain cardboard (brown) printed in one colour black (Similar aesthetic to Dollar Shave). If I integrate the FNSKU barcode into the artwork can it just be black ink on the brown card background….Or does this need code need to be on a white background?
Appreciate your thoughts on this.
Tom
I was literally about to ask the same question. It’s a great blog post, but that was the only question I had i.e. could I print the FNSKU on a standard brown cardboard box 😊
Hi Tom,
Thanks for your comment.
The barcode can be printed on cardboard, yes. As long as it easily reads with the scanner, it doesn’t matter on what material or colour it is printed on.
Thanks,
Andrew
Do you have any US-based packaging manufacturers you like?
No, sorry, can’t help with that.
Andrew
Hi Andrew,
I am planing to add “thank you” card, which will be placed inside the product package. Do you think it’s OK to print on this card instagram or website address?
Greetings
Martynas
Hi Martynas,
Yes, that’s ok. Just don’t make it all about the website, don’t offer any special deals for website purchase etc.
But you can def. put the website address on your marketing materials and even packaging.
Thanks,
Andrew
Just to clarify regarding the shrink wrapping. I imagine you meant shrink wrap the whole product, including the packaging, right? Not the product inside.
If so, will this not create a problem for the Amazon bar code readers will use?
Yes, the whole packaging.
No, there are no problems with barcode readers at all, it’s all clear plastic. Imagine how many products shrinkwrapped are in your local supermarket and they go through the same barcode scanning process.
Thanks,
Andrew
Not using GS1 barcodes is against amazon TOS.
Yes, that is correct.
Why do you mention this? I mean – in what relation to custom packaging?
Incredibly detailed article, some really good information!
Just a little note on web addresses being included on product packages. I spoke to Seller Support just over a year ago, as our packaging features our web address on and they said it was perfectly fine, as long as it’s naturally within the packaging.
Thanks as always,
Joe
Awesome, good to hear that! 🙂
Andrew
Hi Andy, thanks for another great post!
Re: “And you can also use these stock images for your Amazon product images as part of your lifestyle image scenery.”
I have read Amazons product image must “product photos should have a pure white background”, as such it seems like it may be more difficult in time to use lifestyle images with backgrounds sadly.
Thanks,
Mark
Hi Mark,
You can’t do that for MAIN image but it’s totally ok to do lifestyle images for additional images you have for your listing (up to 9 together).
Thanks,
Andrew
Now that’s a serious amount of information! Thanks for all the details of all the different processes involved so even a novice like myself can see the pros and cons easily!
One question though, as I understood it, isn’t it against he TOS to have the packaging in the main image? I thought the main image had to be the product only on a solid white background?
Joe
Hi Joe,
Yes, that is true – to some extent.
It depends really on the product and how the packaging “works” with it. With some products, especially set of products, packaging is part of the overall product.
or for example – same coffee, nuts example – you can’t show a product without the packaging. What about glue? Do you have to empty the tube and take image of that? 🙂
I can’t see any problem with this as long as it makes sense to show product packaging and it’s part of the actual product.
Thanks,
Andrew
Hi Andrew
Can you clarify a couple of points please?
I understood that Amazon image guidelines prohibit showing packaging(or external brand tags) in the main image in many categories, so I believe several of the examples in this article are against Amazon policy(such as the children’s cutlery)? Amazon seem to be having a clean up of main images at the moment with many listings being suppressed due to image violations.
Also is there a law that requires you to have “Made in China” or wherever on your product/packaging? I understand it is legally required for food products but have been unable to find a law that requires it for other products.
Thankyou
Missy
Hi Missy,
Thanks for your comment.
Please see my other replies about using the packaging in the MAIN image.
As for Made in China – it’s a good question! I think that this comes from a EU directive but not sure exactly where to look for specific one that covers this. You could contact Trading Standards and ask them – and then let us all know the answer 🙂
Thanks,
Andrew
Andrew,
Wow – what a great blog post! I can see you’re passionate about it. The power of perceived value can’t be underestimated.
And I can confirm Jay is a great person to work with. More than very happy with the quality of his work.
All the best!
/David
Thanks David, great to hear that! 🙂
Andrew