
Before we get into today’s post, a quick welcome back to everyone as I know I haven’t posted a lot recently.
This is only because I’ve been incredibly busy with some business ventures over the last month or so, including some new offline businesses which I’m excited to hopefully share more about in the future.
But I have a ton of great content and posts planned for the blog and it should be business as usual from now on as we start to gear up for Q4 – the busiest and best time of the year for Amazon FBA businesses.
And I know what some of you may be thinking, it’s only July… Christmas and Q4 are still months away! But anyone who’s been selling on Amazon for a while knows that you have to start preparing way in advance. This is more important than ever with all the shipping and fulfilment center delays we saw last year – and this year on top of that we also have inventory and storage limits to add to the headache.
So no question about it you need to start planning and preparing now. I’ll have more posts on this coming very soon.
Back to today’s post, which is all about advertising on Amazon.
How to do PPC advertising in Amazon?
It’s a topic I get so many emails and questions on as for a lot of people, especially new sellers, it’s very complicated and intimidating. Especially if you’re switching from selling on eBay where promoting a listing is as simple as choosing a percentage!
So does this mean you should simply ignore PPC and sponsored ads on Amazon and rely purely on natural, organic sales? After all that way you have higher margins as well right? 100% NOT!
PPC is vital on Amazon, especially when it comes to a new product launch, and it can be the difference between a successful, profitable product and a failure. You can also read our previous article about Amazon PPC Auto Campaigns.
Every week I get emails that go something like this:
“Hi Andrew, I’ve launched a new product on Amazon and my listing has been live for a few weeks now but I have barely made any sales. Can you check it and tell me what’s wrong?”
And the truth is a lot of the time there’s simply nothing wrong with the listing itself. Especially for blog readers and Amazon Sharks members who know how to create a great listing, with:
- strong branding
- great product pictures
- well written and engaging descriptions
- top quality enhanced brand content
- Etc!
Why new Amazon Sellers aren’t making sales?
Simple – Amazon isn’t sending any traffic to their listing!
If you think about it this makes perfect sense, right? After all, Amazon sends traffic to listings that they think will make a sale, and for a new listing they simply have no data to go on – they don’t know what your conversion rate is for different search terms.
So it would be a risk to send valuable traffic to your listing / product without getting anything in return.
Which can leave a new product in a vicious negative cycle:
no traffic = no sales, which = no traffic!
And that’s where sponsored products comes into play.
What is sponsored products on Amazon Advertising?
With sponsored products you pay Amazon to send traffic to your listing. You then make sales. This shows Amazon that your listing / product is in fact good enough to send customers too and suddenly not only are you making sales through your ads, you’re also climbing up the search rankings and making organic sales too.
This is a key part of PPC and sponsored products on Amazon that so many people don’t get. It’s not solely about making profit directly from these ads, but also using them to increase your sales velocity. And now instead of the negative cycle, we have something amazing:
Sponsored products = traffic to your listing = sales = increase in search rankings = traffic to your listing = sales!
I hope you now understand why sponsored products aren’t something you can simply choose whether to do or not – it’s vital. And actually it’s nothing to be scared of anyway, IF you know what you’re doing it can be a profit making machine for your Amazon FBA business.
In today’s post I’m going to break it down, make it as simple as possible and give you a basic plan of action for how to get started which you can apply to your own products.
Simply put sponsored products is a paid advertising system built directly into Amazon that allows us sellers to create and customize ad campaigns.
However, this isn’t some basic low-level listing promotion like on eBay, with Amazon sponsored products we can set:
- keywords to target
- set maximum bids / cost per click
- set when our ads run
- set the type of ads we use
- set the total amount we spend
You get the idea!
How it works is that you pay every time someone clicks on one of your ads, i.e. you pay every time someone is sent to your listing. This is known as pay per click, or PPC, and is much better than paying per impression, which means you pay every time someone sees your ad.
PPC is a lot easier to calculate and control as in effect there’s only a few important numbers that will make or break your advertising campaign:
- Your cost per click – the amount you pay every time someone clicks on one of your ads on Amazon
- Your conversion rate – the percentage of people who end up buying after viewing your listing
- Your net profit per sale
Example PPC Amazon Advertising Calculation
As an example, I have a product which is £15 and I have a 35% net margin, giving me £5.25 profit per item.
My cost per click for my sponsored products advertising campaign is £0.50.
And finally my conversion rate is 29%.
That means for every 100 people that view my listing, I get 29 sales. Those 100 people (clicks) cost me £0.50 x 100 = £50. And those 29 sales give me £5.25 x 29 = £152.25 in profit.
So £50 spent on ads to make £150+ in profit – sounds good to me!
Obviously this is just a basic example so you understand how it all works together (and why I’m always talking about the importance of conversion rate!).
How to set-up PPC the first time
Again, this is actually a lot simpler than most people think. I know a lot of Amazon gurus like to make it sound like rocket science where you need complex software and spreadsheets to make it work, but it really isn’t that difficult.
Once you understand the basics and know enough to be able to create your own campaigns, then the rest is easy enough to master.
Let’s get to it.
To start with, login to your Amazon seller central account and then click on the Advertising tab and then Campaign Manager which will open a new Amazon Advertising window.
This is where we’ll create our campaigns.

When you click Create Campaign, you’ll be given three options for the campaign type:
- Sponsored Products
- Sponsored Brands
- Sponsored Display

If you want to learn more about what each of these campaign types are, simply click the explore button beneath each option and a very useful pop-up appears, with a clear explanation and video on each one made by Amazon.

For now we’re only interested in Sponsored Products so select that to start creating your campaign.
Creating A Sponsored Products PPC Campaign on Amazon Advertising
The first thing you need to do is set a campaign name – to keep things simple I just use the product name followed by Auto or Manual (we’ll cover that in a little bit!).
So “Widget – Auto” for example.
Next you set the start and end date and your daily budget.
Now this will of course depend on your individual business, but when launching a product I suggest a minimum of £10 for your daily budget, ideally more. This is because anything lower than that and you simply won’t get enough clicks. With this first campaign we’re trying to achieve two things:
- We want clicks and sales
- We also want to gather data which we’ll use later to create and optimise more ad campaigns
So anything less than £10-£20 and the process will be too slow.
Next you select the campaign targeting type, from two options – Automatic targeting or Manual targeting.
With manual targeting you provide Amazon a list of keywords that you want your ad to be shown for.
With automatic targeting, you guessed it, Amazon automatically generate a list of keywords to target with your ad. This is based on your product, listing title, bullet points, and description.
For our first campaign we’re going to choose automatic (more on how this ties into our overall strategy a bit later).
So our campaign now looks something like this:

Set your PPC Campaign Bidding Strategy. Three options!
There are three options to choose from here:
- Dynamic bids – down only: This allows Amazon to sometimes lower your bid amount when it’s less likely to convert to a sale.
- Dynamic bids – up and down: This allows Amazon to both lower your bid amount when it’s less likely to convert to a sale as well as increase it (by up to 100%) when it’s more likely to convert to a sale.
- Fixed bids: Amazon won’t change your bid amount based on whether it’s more or less likely to lead to a sale.
If these three options weren’t confusing enough, Amazon also offer additional settings which allow you to increase your bids based on where your ads are placed.
So you can allow Amazon to increase your bid amount, by up to 900%, to have your ad shown at the top of search (the first page) or on other product pages.
Now don’t worry if this is starting to get a bit confusing or if that 900% increase sounds a bit scary, because I actually don’t suggest using these options. I’ve tested them personally in my own business and find it very difficult to achieve a positive ROI with these bid options.
I think they’re purely for big brands looking to burn through an advertising budget to get their products seen as much as possible, but it’s very hard to make them profitable…
So just keep things simple – ignore these final options and just go with either Fixed bids or Dynamic bids – down only.
Dynamic bids – down only is what I suggest as it’s the safest and simplest option.

Let’s move on to the next section – create an ad group.

First up, the ad group name. I use the exact same name I used for my campaign. And the reason for this is that I create a new campaign for each product / listing I want to run ads for. I don’t combine multiple products into a single campaign.
That way it’s so much easier to monitor your ad campaigns and to optimise them and I really don’t see any benefit to grouping them together.
So just copy the same name for the ad group and then search for / select the product you’re creating the campaign for.
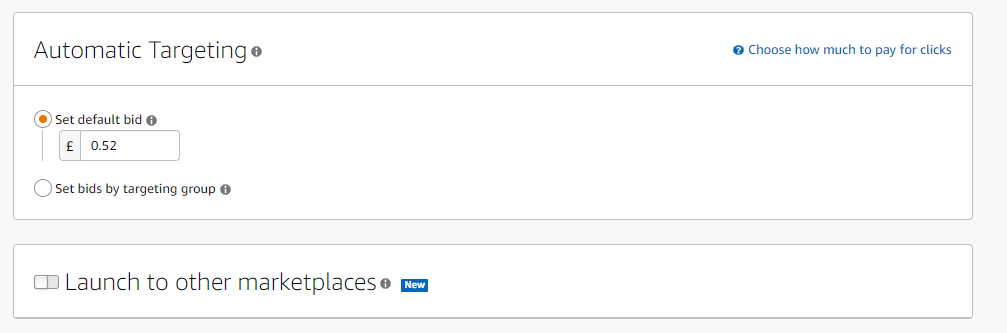
Next up is the really important part – your bid amount!

Here you set your default bid, which is the maximum amount you’ll pay for each click for your ad.
You may be wondering why not just set this as low as possible then?
Well because then your ads simply won’t be shown!
Just think about it, you’re not the only one running ads for that keyword on Amazon (well it’s extremely unlikely at least) so if you’re bidding £0.20 per click and another seller is bidding £0.50 per click, then Amazon aren’t going to show your ad to many people!
You’ll need to increase your bid to a competitive level or there’s simply no point.
BUT it’s not as simple as highest bid wins, no Amazon are a little smarter than that and they also take into account the click through rate of your ads and the conversion rate of your product.
What’s the click through rate (CTR)?
It’s the percentage of people who view your ad who click on it and is calculated by:
clicks / impressions x 100%.
For example if Amazon show your ad to 10,000 people and you get 600 clicks, that means you have a click through rate of 6% (600/10000 x 100%).
And let’s say your competitor is running an ad that only gets 400 clicks from every 10,000 views, giving them a 4% click through rate.
That means that even if you were bidding £0.50 per click and your competitor was bidding £0.70 per click, Amazon would still make more money from showing your ad even though they’re bidding 40% higher!
And conversion rate is as you know the percentage of people who make a purchase after viewing your listing.
This is also incredibly important to Amazon as they don’t only care about their ad revenue (shocking I know) but also about how relevant the ads they show to customers are.
And a higher conversion rate means that people found what they were looking for.
So what does this all mean? What bid amount should we use for our campaign?
Well actually there’s no complicated math needed here, at least not at this point. To start off I even suggest using Amazon’s suggested bid amount, but increasing it ever so slightly – if they suggest £0.50, use £0.52. If they suggest £1, use £1.02, etc.
This is simply so that you can outbid other sellers who are using the suggested amount, even if it’s only by a penny or two.
Next up Amazon auto select to launch your ad campaign on other marketplaces at the same time but you can deselect this as it’s not needed.
Then last but not least we have two optional sections:
- Negative keyword targeting

This is where you enter keywords that you specifically want to be excluded from your ad campaign.
There’s nothing I would suggest adding at this point but this can be extremely useful later when you’re monitoring and optimising your campaigns as you may find certain keywords that have a negative ROI.
- Negative product targeting

Negative product targeting stops your ad from being shown on certain products. Again, I wouldn’t suggest adding anything here when creating your campaign, but it’s something you can come back to once you start getting some data in.
Next is to click that launch campaign button. Congratulations you’ve created your first Amazon ad campaign!
It wasn’t that hard was it?
Definitely, this is only the beginning. The plan is to run this automatic campaign for at least a week and then we’ll come back to it. At that point we’ll create a manual campaign using the data we’ve got and then start optimizing.
I’m going to cover this all and more in Part 2 of our Amazon sponsored products guide. I’ll share with you the system I use to launch, rank, and run profitable sponsored products campaigns for all my Amazon listings.
We’ll also dive into a bit more detail and compare Amazon sponsored products to other advertising options, including driving external traffic to your listings via Instagram, Facebook, and more.
I’ll see you there!
Until next time.
All the best,
Andrew


Hi
Did you get to write the blog about how to drive external traffic to our listing via Instagram and Facebook? Worth also including Facebook Marketplace?
I would be interested in reading this blog. Thanks
Hi Simon,
That’s on our list for this year!
Hi Andrew,
Thank you for the valuable information as you always post.
When you add all the sale generated keywords from AUTO to MANUAL 3ad groups, do you then add those keywords to Negative in the AUTO campaign ?
Which keywords will be charged in PPC if they are running in both campaigns AUTO & MANUAL at the same time ?
Kind regards
Zia
Hi Zia,
You don’t necessarily have to do that. Personally I would leave both running (as long as the keyword is profitable in both campaigns of course).
All the best,
Andrew