 One from every two eBay listings I look at has some sort of issue with product pictures… in fact it’s probably even more common than that!
It’s unbelievable that so many sellers simply don’t understand the basics of image editing, re-sizing and saving correctly for web and eBay use. The most common problems I see are:
- Wrong image file type
- Wrong image size
- Wrong image file size
- Wrong image resolution
- Wrong proportions
You have to get all 5 of these RIGHT to have perfect product images on eBay! By messing up only one of these things, you’ll do a lot of harm to your listings which will also affect your conversion rates and sales.
In today’s blog post I want to cover this problem once and for all and give you a clear plan to follow so you can FIX your existing product images and do everything correctly for all future listings. While this may sound like a complicated and overly technical subject, when you know the basics behind it, it’s actually very simple and straightforward. So let’s get started!
Image File Type
There are various image file formats/types available, such as:
- JPEG
- PNG
- GIF
- And others.
For eBay product pictures you want to use ONE and ONLY ONE image file type, which is – JPEG/JPG (both are the same file format, just named differently depending on the operating system your PC uses).
Simple – only JPEG files and nothing else! This should be so obvious but I still see listings with PNG and GIF images, which are really only meant to be used for graphic files and illustrations, not product pictures!
Image Size
Now the most complicated part – image size. For web use it’s measured in pixels, and not centimetres like some people believe. One pixel is basically one dot on your computer screen. It’s a metric value so 20 pixels will be 2 times more than 10 pixels.
From digital cameras you get a very large image size by default but you CAN’T use such images for your eBay listings!!! They’re way too big and will load very slowly due to their size. So you want to edit them before uploading to eBay or your own hosting account.
As a general rule of thumb, your GALLERY image should be 1600 x 1600 pixels or more. 2000 x 2000 will also be ok but there’s no real need to go bigger than 1600 x 1600 pixels.
Yes, it’s a square image which means that you’ll have to do some cropping, which we’ll cover later on.
For now, you just have to understand that you want to create/save a SEPERATE image for Gallery use, sized exactly 1600 x 1600 pixels.
For your template/listing description part you need to use a DIFFERENT set of images, ones much smaller than the 1600 x 1600 pixels used for the Gallery image.
The exact size of the images you will use depends on the size of your template as the pictures obviously have to fit within the template’s width.
You can easily measure the width of your template using this simple approach:
- Open up your template and using screen capture software (such as the Sniping tool for Windows); capture an image of your template’s description area.
- Save this image on your desktop.
- Then simply right-click over this newly created screenshot to get a list of options.
- Select Properties > Details
 And there in Image dimensions you’ll see the exact width of the screen capture which of course corresponds to the width of your template.
If this sounds too complicated to you, just stick with 600 pixels in width for ALL product images you use in your template’s description block.
600 pixels should fit almost any eBay template out there so that’s a very safe bet.
What about the height of the image? Well if the width is 600 pixels, the height will usually be around 400 pixels. Height isn’t really that important as it won’t break up your listing template! Just use whatever size seems right for you when cropping images. If the product image is in portrait format, the height will actually be more than the width so in cases like these, the width will still be 600 pixels but the height could be 800 or even 900 pixels. This is fine as long as it looks good and suits the product you’re selling.
Image File Size
This won’t directly affect HOW your images look on eBay BUT it will affect your listing’s performance. How? If your image file size is too big, your listing and images will take longer to load/show up in a viewer’s browser. This is CRUCIAL nowadays when so many people use mobile devices to shop on eBay. The slower your listing loads, the higher the chance that people will hit that Back button and never even get to see your offer.
Image file size is measured in KB (kilo bytes) and for web/eBay use you really want to keep this number down while still maintaining good image quality. By default, a high quality JPEG image sized 600 x 400 pixels can be as large as 300KB or more. This is too much, especially if you have loads of images in your listing.
How to reduce the image file size?
Use compression when saving your images, before uploading them to eBay or your own hosting account. Later on we’ll cover exactly how to do this but just so you know – by using image compression, the size of your image will go down significantly but the quality will remain almost exactly the same (regular internet users won’t even notice the difference).
 A properly compressed JPEG image sized 600 x 400 pixels should be no more than 100KB, 150KB MAX for complicated images. If you have lots of white space in your images, the size can be as small as 50KB, which is perfect for eBay use and will load up very quickly when people land on your listing.
Image Resolution
This is measured in DPI (dots per inch). Technically, for web use we should use PPI (pixels per inch) but basically these terms are used in the same way when talking about simple image processing.
The rule is very simple here – use nothing but 72 dpi for ANY kind of product images, graphics, website design or any other files for web use.
Your camera takes images @ 300 dpi, which is a much higher resolution and meant to be used for printing purposes. You don’t need 300 dpi for web use! Monitors can’t display more than 72 dpi so that’s the industry’s standard and the exact resolution you need to use for eBay product images, to keep their size down.
Proportions
Lastly, one of the most common mistakes I see newbie photo editors make when re-sizing and cropping their images is to screw up the image by not following its original proportions.
This is usually caused by the WRONG method of re-sizing and cropping product images.
You want to keep the correct aspect ratio for your images to avoid an outcome like this:
 Later on I’ll show you an easy way to fix this potential problem by re-sizing your images directly using the Cropping tool.
Pretty simple, right? Then why are you not following this? Why are you making a mess out of your eBay product images? Chances are you don’t know how to edit and save your images correctly, so let’s cover this process in a simple, step by step guide.
Picture editing & saving
First of all, you’ll need some kind of photo editing software to edit the images you get from your digital camera. Remember – you CAN’T use images directly from the camera as they’re way too big to be used on eBay! You need to edit and properly save them first so they fit all 5 criteria already mentioned in this post.
I personally use Photoshop Elements for this task, which is a very popular photo editing software made by Adobe. You can get a 30 day, fully functional FREE Trial here or simply purchase the software from Adobe’s website, eBay or Amazon. Expect to pay around 60-70 pounds for a physical version of this software.
If you can’t invest any money into this, there are always free alternatives out there. One of the most popular is GIMP – an open source photo editing software that works pretty much like Photoshop. It’s more complicated and not as user friendly but hey – it’s FREE! And for basic image editing you really need to learn just 2 or 3 functions.
If GIMP looks too complicated to you, there are FREE online tools that can be used for the same job, such as:
- http://pixlr.com/
- http://fotoflexer.com/
- http://www.fotor.com/
- http://www.picmonkey.com/
- http://ipiccy.com/
I personally don’t like working with these online tools as they’re slow and somewhat awkward to use, especially if I need to edit large batches of images, but for some people they may be just fine.
No matter what software you use, the principles stay the same and the tools/functions I’ll cover in this guide will be available on all programs.
First Things First
So, the first thing you want to do is copy all product images you have taken from your camera to your PC. There are two ways to do this:
a) Via USB cable – connect your camera to your PC and copy all images to your local hard drive.
b) Memory card – most computers nowadays have memory card readers so you can simply take the memory card out of your camera, plug it into your PC and copy images this way.
Option B is quicker and easier as there’s no messing around with cables plus transfer speed from card to PC is usually higher than via USB.
If you don’t have a card reader built in to your PC – then of course you have no choice but to use a USB cable to connect your camera to your computer.
You might be wondering why I’m even bothering to mention this step but I’ve seen many people make the mistake of NOT COPYING the image files to their computer and just opening them directly from the camera. Technically you can do this but I wouldn’t recommend it as there are several technical issues that can occur as a result, so keep things simple for yourself and make sure you always copy the pictures directly to your computer before starting any editing work.
Step 1 – Open the image in editor
Simply open an image in your chosen photo editing program. You can work with multiple images at once if using Photoshop or GIMP but if you’re completely new to this, start with just one image at a time.
Step 2 – Cropping/Re-sizing
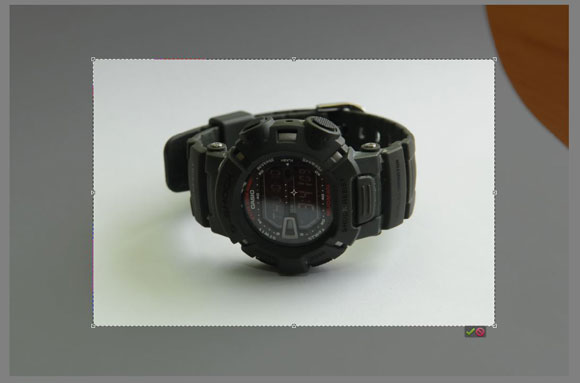
In most cases you’ll want to start the editing process with the cropping tool. Sometimes you’ll have some background set-up details shown in the image (like in the example below) that you’ll need to remove but more often you’ll want to crop your product image so that the ITEM ITSELF is better positioned:
 Also, during this process we’ll RE-SIZE the image so it’s perfect size for eBay use!
To do this; click on the Cropping tool from the left-hand side menu.
![]() REMEMBER!!! You can always UNDO a step if you’ve made a mistake by going to Edit > Undo. You can go back several steps this way so don’t panic if something you do doesn’t work out as planned – simply undo the last few operations and you’ll be back at the same point you started at.
REMEMBER!!! You can always UNDO a step if you’ve made a mistake by going to Edit > Undo. You can go back several steps this way so don’t panic if something you do doesn’t work out as planned – simply undo the last few operations and you’ll be back at the same point you started at.
If you’re working on listing images, the size will be different compared to gallery images. As covered earlier in the post, in most cases the width will be around 600 pixels and height – 400 pixels but this will depend on the template you use and how large an image you want to display for the product you’re selling.
Lastly, you need to set the resolution here. Remember, you want to use 72 dpi and nothing else. So just do that and write 72 dpi in that block.
Once you have set the resolution to 72 dpi, and customised the height and width, all you have to do is select ALL of the image with the cropping tool enabled and hit ENTER or click on the green tick. By doing this you’ll automatically re-size the image to your pre-set values.
If you want to leave some parts of the image OUTSIDE your final edit, you can simply select part of the image with the cropping tool like this:
 Now our image is prepared for the last step in this process…
Step 3 – Saving for web use
After you’ve cropped & re-sized your image, all you have to do is save it for web use! In Photoshop Elements, go to File > Save for Web and a new window will show up with some variable settings.
Just select JPEG High from the pre-set list (if it’s not already selected by default) and click on the OK > Save button.
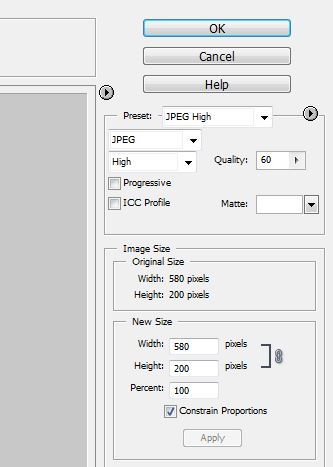 This process compresses the image’s file size so it’s perfect for eBay and general web use. You don’t want to save these images as FULL QUALITY JPEG files; they’ll be too big in size and will load slowly in your listings. Always use the Save for Web function in Photoshop to fix this problem with the click of a button.
If you don’t have Photoshop, there should still be some kind of image compression method available in your software. Look for JPEG quality settings or image compression settings to adjust these values.
And that’s all there is to it! Just follow these 3 simple steps and you’ll get perfect eBay product pictures every single time. There’s no place for interpretation – this is a set of rules you have to follow each and every time you create pictures for your eBay listings.
Just to remind you of the 5 things you need to keep in mind when preparing product images for eBay use:
- Image file type – use only the JPEG file format and nothing else.
- Image size – 1600 x 1600 pixels for gallery image and a smaller size for description images (the exact size depends on the template you use).
- Image file size – use the Save for Web function in Photoshop or image compression function in other software to keep files sizes down to a minimum.
- Image resolution – 72 dpi and nothing else.
- Proportions – use the “Keep aspect ratio” function IF you want to maintain the exact image proportions as in the original picture OR de-select this if you want to crop out selected parts of your image.
Still confused? Please re-read this guide as many times as needed to fully understand all the technical terms so you can once and for all get this right. You only have to learn this stuff once! After that you’ll be a pro picture editor and your eBay images will always be in perfect shape!
Any further questions? Feel free to ask below this post and I’ll answer you personally.
Thanks,
Andrew


Excellent read, Andrew. My problem is viewing products images on Ebay listing with smartphones. The images have text and viewable on Ebay mouse over to zoom. However, the images are pixelated blurred and difficult to read on smart phone. I’d appreciate your suggestions to fix this frustrating problem. Thanks.
You’re the SELLER for that item?
If so, you need to upload product images in HIGHER resolutions to eBay. At least 1500 pixels wide.
I am using Lightroom 6 to process my photos from a Cannon70D. I shoot in jpeg with a 1:1 ratio and develop/edit in jpeg as well. Then I export back to Windows picture file until ready to upload to Ebay.
When I do this, a lot of my photos show up really small in the photo box on Ebay. (the photo square does not fill in all the way, or the photo appears too small.)
Am I missing something during import/export to or from my Camera, Lightroom or Ebay? Can you possibly give me some suggestions. In anticipation of a great big Thank you! Jenn B.
Hi Jenn,
What happens when you upload an image straight from the camera, without using Lightroom?
Do you get normal size image on eBay then?
If so, the export/save functions in your Lightroom needs to be adjusted – there’s probably a size setting that affects saving process you can change.
Thanks,
Andrew
Once disk is inserted, it goes to Photo viewer. I cannot change anything from there on my Windows 10 computer. So, I got Lightroom. My camera settings are 1:1 with hi resolution. When I export from Lightroom to c:\Pictures\My Photos…, It will show me that the photos have been cropped, but they are smaller than they appear. Then, when I add them to the photo boxes on Ebay, they either do not fill the frame and have white (or black) edges around them. I use the Resize to crop in lightroom and have my export settings at jpeg 60. resize to fit 1600 x 1600 and 240 dpi.
Hi Jenifer,
I’m sorry but I’m not sure what exactly you’re asking?
What is your question?
Let me know.
Andrew
Hi again Andrew,
I’m also having issues with images, I’ve followed your guide and set my images with a maximum width of 600 pixels, keeping them around the 100 kb size at 72dpi with around a 60% compression.
The images look fine on my desktop and okay on my mobile when going through the internet explorer but when I test my listings using the Ebay app they are massively breaking the template and just look awful. Do you have a fix?
Hi Matt,
Get in touch with me via my help desk, send me link to your listing so I can check it out and give advice on the fix:
http://help.andrewminalto.com/Tickets/Submit
Thanks,
Andrew
Hi Andrew –
I have a question about eBay store description page. I notice on the older stores, when you click on a product it brings you to the product description…when you scroll down there is a large static image. On the newer eBay pages, there is an active menu bar at the top of the image that can take you to a blog, contact page or the eBay store home page etc. Here are my 2 questions.
1. Is the menu bar here to stay meaning that is how all pages are going to be going forward?
2. If not and I can still use the old page with no menu bar – what should my image specs be for that section?
Please let me know and thank you!
Jaime
Hi Andrew
I am really struggling and would welcome your help. I have put some images onto my ebay template that are 600 x 400. They looked great on the computer but when I looked on my mobile they were way too big. I reduced the DPI to 72 as you said and the resolution is 66KB. The format is JPG. Its still way too big and I don’t know what else to do. Finally I have got my first few listings done but now feeling a bit deflated. The normal text and your template is fine though. Its just the images which includes a couple of banners that I had designed that look way too big. Also a section where I did 3 bullet points hosted online and with bold text that look too big and is out of whack. Please help asap as I already have the listings on there live.
I have been using picmonkey and another free editor .
Thanks
Hayley
Hi Hayley,
Please contact me via the Helpdesk, with a link to your listing and I will take a look.
Most likely you haven’t added “responsive” tag to images, which is an easy fix 🙂
Thanks,
Andrew
Thanks Andrew, with your help – all sorted ?
Great to hear that! 🙂
Thank you for your information it has confirmed a lot stuff. I have listed my first items onto ebay store, I’m selling wedding invitations, the invitation pictures I have in my listing have all been printed on Ivory linen card, however the pictures look very different from the way it looks on my computer. All the pictures are 1600 x 1600 and file size is about 1.5MB, I’ve even tried using 2100×2100 and other sizes but no joy. Only way you an see the actual design of the invitations is by zooming in and this shouldn’t be the issue. Any ideas, any suggestions would be appreciated.
If there are small details you need to show – use additional images zoomed in/macro shots so that people can see those small details without zooming in your images.
Andrew
Thanks for this – have been looking for ideas on how to jazz up my eBay listings. Just wanted to make the point that nobody needs to worry, at all, about the resolution of images for web display. You can ignore it entirely; it doesn’t need to be changed to 72dpi, or anything else. Image resolution is just an instruction to the printer about how closely to space the dots. When viewed on screen, the image is always displayed at the resolution of the monitor its being viewed on regardless of what dpi the picture is saved as. The DPI makes absolutely no difference to file size, because a pixel is still just a pixel.
[…] speed this up, make sure your gallery images are optimised – by this I mean don’t use raw images straight from your camera, as they’re very big […]
Hi Andrew, Just wanted to say great article. I followed what you said, learned GIMP… and this is also really useful for when making websites so the files are not to big! frickin awesome. cheers! Jason
You’re welcome Jason!
[…] have talked about this a lot in my product photography guides as well as more recently in Don’t Mess Up Your Product Images blog post. But I think it needs to be repeated as I review eBay listings every week that are […]
Hi, This whole square image thing looks really bad its out of proportion and I don’t understand how to fix it… I tried changing the width to 1600 pixel and it automatically changes the height to 2176… When I click save for web use and save it, the image size is 293 kb… Would that work? by the way this is for gallery images
This is for clothing, specifically sweaters
Hi Zoobi,
You want to use CROP tool to create these square gallery images. Then it will be perfect square and you won’t mess up image proportions.
Thanks,
Andrew
i am totally confused about the process… this is the process that I’m using.. I change the size of the image to 1600 x 1600… and then I am using the crop tool but theres nothing to crop since the image is already a square and looks extremely weird… the image looks like it has been squashed down.
Hi Andrew,
Thats good information. I dont have areal camera, so i take pictures with my LG G3 android phone.
Do any of your instructions apply for phone uploaded pictures to Ebay listings?
Same rules would apply with images taken by a smart phone.
You should still transfer them to your PC first and do basic editing before uploading to eBay – to get size and ratios right.
Thanks,
Andrew
Hello Andrew
Thanks for this post. I was scrolling to get idea of pics. Normally, I never click pictures. All I do is copy from other websites..:D
As, an example, lets say, I want to sell LCD Assembly for a phone (Asus Zenfone 5)
and here is one picture.
I want to make this perfect for my listing. Could you answer below questions:
1.) Please explain me steps for this image using some online free photo editors since I dont know usage of Photoshop or GIMP. I tired editing it using paint. But whats with resize…? If I keep ‘Maintain Aspect Ratio’ checked, I cannot make it 600*400. And if I unselect ‘Maintain Aspect Ratio’, and den do it 600*400, pic gets very ugly as you have mentioned even in mistake points people make in your article.
So, how to do it..?
In your example above, does photoshop do something differently..? Does it maintain aspect ratio..? If yes, how editing to 600*400 doesnot alter proportions horribly.?
2.) Secondly, whats best to erase those watermarks and come up with your own watermark..?:D
Is there any simple editor for newbies to do that..?
3.) The pic I have mentioned in Link clearly has very less width and very large height. I dont think its possible to get 600*400 pixels for such image by not distorting it..?
Please let me know above and then I would ask more if I am confused. Thanks a lot:)
Hi Manjo,
1) Just check YouTube – tons of videos there on how to do such simple edits in any program!
2) You CAN’T do that! It’s stealing!
3) If it’s a portrait image, you will want to change size accordingly to say 400 x 600 or so (longest side – height!)
Thanks,
Andrew
What size images would you recommend for an ecommerce website?
Hi Sammy,
It will depend on your shop’s layout – how large image fits the product page. Then for the zoom in version, usually you would go max 1000 pixels in width/height but if it’s a very detailed item, like jewellery, even more.
Thanks,
Andrew
[…] you haven’t done it already, please check out my product image guide here which teaches you all you need to know about resolution, image sizes and settings for eBay […]